Replenishment
Ordering by Sales Replenishment
Select the sales range to review, which defaults to the first day of last month until today.
Set the safety buffer, which defaults to 5%. This buffer adds a percentage oversupply to account for unexpected sales fluctuations.
You can choose one or more suppliers and attributes to include in the order process.
Press <F9 Save> to advance to the items to order page.
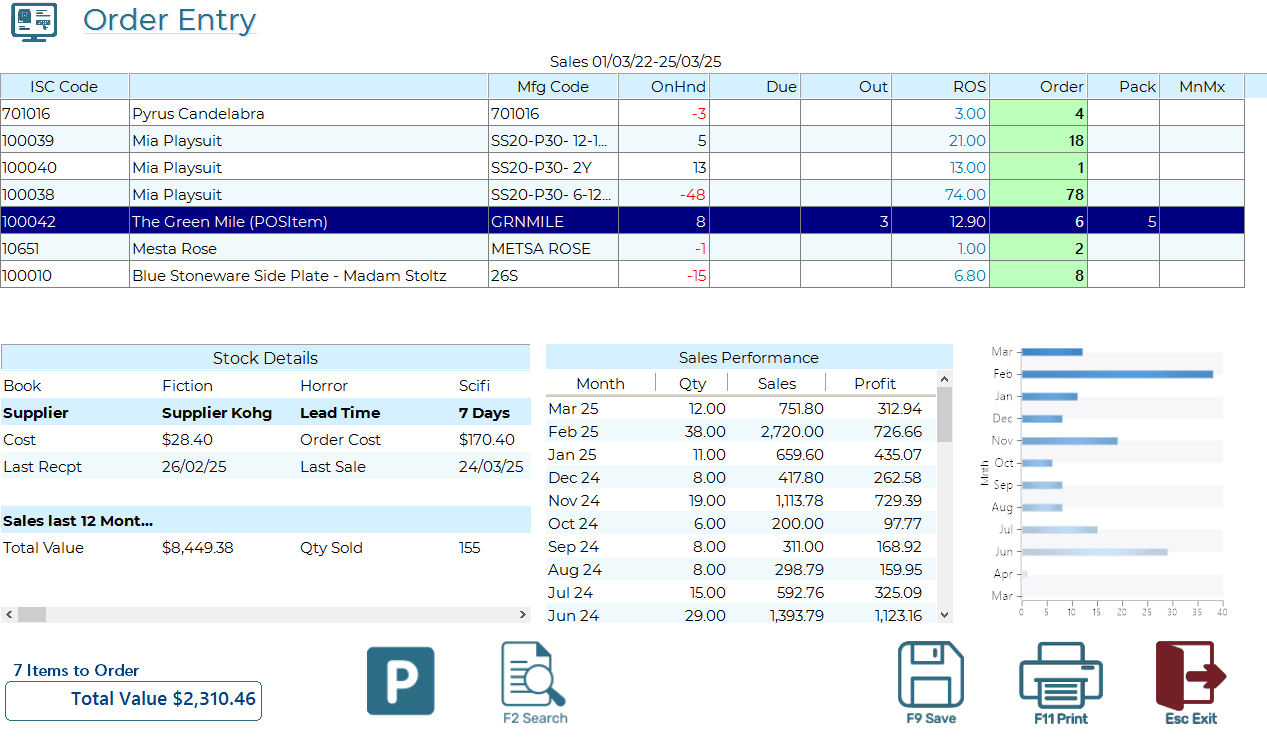
This page is divided into two distinct sections:
- Items Grid The Items Grid displays individual items along with their suggested order quantities. You can adjust the order quantity in the green column. The grid includes the following details:
- OnHnd – Current quantity on hand.
- Due – Items on order but not yet received, including incoming transfers.
- Out – Items already committed to sales or other allocations.
- ROS – Monthly average rate of sale over the past year.
- Order – Suggested order quantity (modifiable).
- Pack – Pack quantity; orders must align with supplier pack sizes (e.g., ordering 5 when the supplier sells in packs of 12).
- MnMx – Minimum and maximum stock levels set for the item.
- Stock Details – Provides relevant information to assist with decision-making. As you navigate the Items Grid, this panel updates to show details for the selected item.
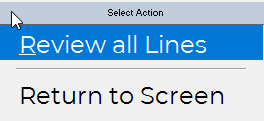
Manually adding other items to the Order
You can right-click the Items grid and select "Review All Lines". This will load the grid with all qualifying lines, including those not typically ordered. It allows you to override the system and manually choose which items to order.
Note: The Stock Details part of the form will continue to function as it does with existing lines.
Park the Order Screen
If you’re using a single POS and need to serve a customer, simply click or tap the Park icon. This will temporarily close the ordering screen. After completing the sale, you can return to ordering via Operations > Order Stock. The system will recognise the in-progress order and reload it automatically.
Print Order Checklist
You can print an Order Checklist, which is not an actual order but a simple listing. This can be used to walk around the store and perform a quick sanity check before finalising the order. Print this listing press <F11 Print>
Creating the Order(s)
Once you are satisfied with the ordered quantities, press>F9 Save>. The system will generate the orders in both the local POS database and the cloud-based Central database.
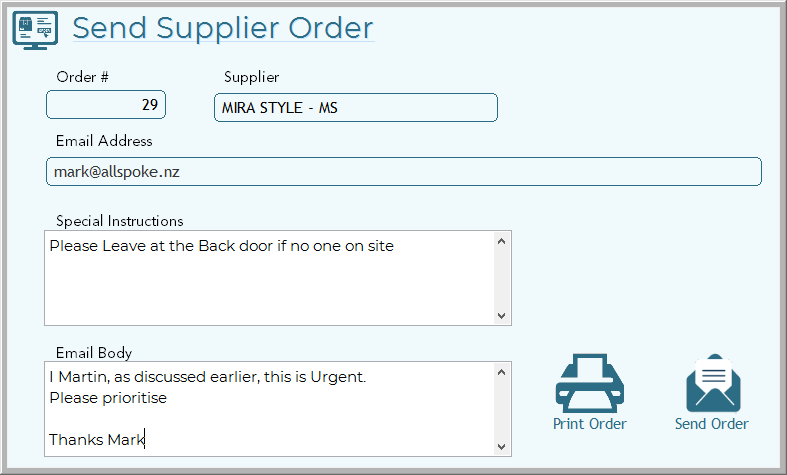
- If the supplier has an email on file, the order will be sent automatically.
- If no email is available, the order will be displayed on-screen for review and printing.
- For Each order you will be presented with the opportunity to modify the email address to send the order to as well as add delivery instructions (these print on the order) and/or add an email body to the email itself.
A summary report will be produced to screen outlining the orders that have been made for your reference